How to create a static website with Hugo Academic
In this post, I will show how you can build a website with Hugo using the academic
theme. There are many useful guides out there, and you should first read
Hugo website . Hugo claims to be “The world’s fastest framework for building websites”.
However, it took me a while to make this work. This is the solution what worked for me on a Linux-based system.
I keep modifying my website locally, and I can deploy the incremental changes within seconds on my web server.
1. First Steps in RStudio
I use an R package, called blogdown to create and update my website. This package takes advantage of R Markdown files and Hugo. I recommend you read
Blogdown: Creating Websites with R Markdown by Yihui Xie and Amber Thomas. I am assuming that Rstudio is installed on your
linux machine, and that you are familiar with this IDE. Markdown is a simple formatting syntax for authoring HTML, PDF, and other documents.
Open Rstudio from your Application menu (or launch it from a terminal).
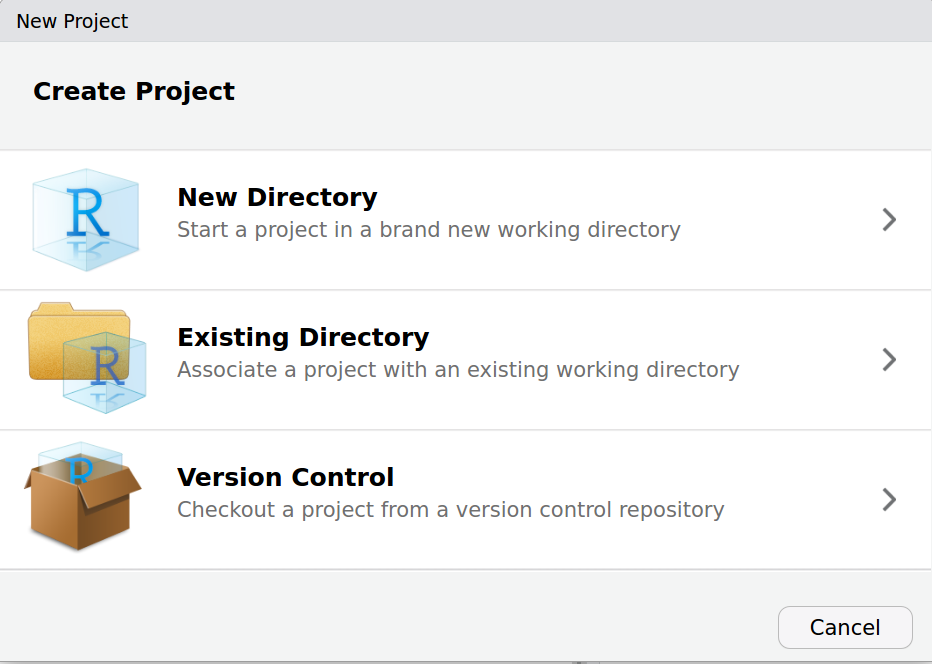
In the “File” menu, open “New Project…” and select the option “New Directory”, then in the
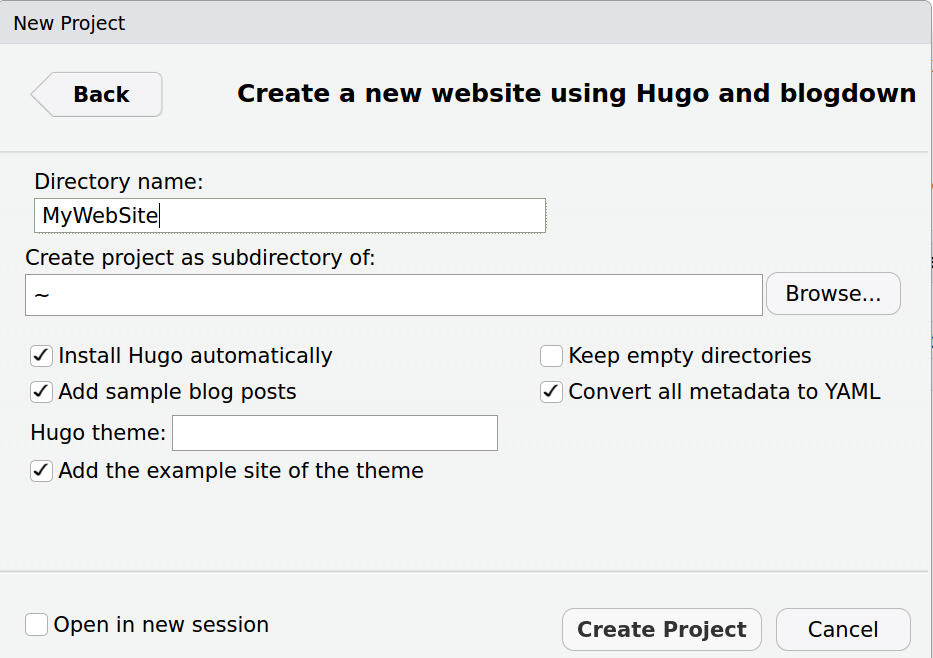
“Project Type” window, select “Website using blogdown”. In the Dialog Window which immediately appears, fill in the name of the directory where you will build your website. Leave
the “subdirectory” and “theme” blank. The final step is to click “Create Project”.
If all went well, you can now load the academic theme as follows:
blogdown::install_theme(theme = 'gcushen/hugo-academic',hostname="github.com",theme_example=T,update_config=T,update_hugo=T)This should install the academic theme and update the config.toml file.
If the above steps failed, you can do this manually: launch rstudio in the empty directory where you first attempted to build your website, and install devtools and blogdown:
install.packages("devtools")
install.packages('blogdown')
then install Hugo
blogdown::install_hugo()Finally install the academic theme:
blogdown::new_site(theme = 'gcushen/hugo-academic', theme_example = T)The final step is to build the default website by typing:
blogdown:::serve_site()or by selecting the option “Serve Site” in the “Addins” menu of RStudio.
You will then see your website in the built-in Viewer of RStudio.
It is better to view it
in your browser at the URL:http://127.0.0.1:4321. Explore its features, and take a look at the
structure of the home directory: you should see the file config.toml and five subdirectories:
config, content, public, resources, static, themes. Most of the data resides in the
content subdirectory.
2. Personalize your Website
There is a lot left to do to personalize your website.
- The first step is to open the configuration file
config.tomlwithin Rstudio. It is located in the home directory of your website. Select this file to edit it in the file editor pane of RStudio (top left). This file allows you to control the configuration and appearance of your homepage.
You can set the “title” of your homepage, your “name”, your “role”, and your “organization”.
Initially, the baseurl is set to “/”. You can change it after you deploy your website.
Leave other variables unchanged (for now).
- The second step is to select a picture of yourself and save it as
content/authors/admin/avatar.jpg. Next, you want to edit the content of the filecontent/authors/admin/_index.md. The content of the header of this YAML file is self-explanatory. Edit the short biosketch which follows the header. The content of this file will start to considerably alter the look of your homepage. As you make these changes, reload the homepage in your browser.
You also want to edit the file config/_default/params.toml, mostly by updating your
Contact details. Decide which personal information you want to reveal. Also, change the math = false to math = true.
- The third step is to specify which of the widgets you wish to show in your homepage. These widgets are controlled by Markdown files in the
content/home/directory. For instance, you may want to turn off the content of thecontent/home/about.mdfile: just change the variableactive = truetoactive = falsein the header of this file.
If you turn off this widget, this will remove all your personal information section of your home page, including your picture and biosketch. Decide which of the widgets you want to keep in your homepage.
You could start by deactivating all the widgets (except the About widget) and turning them on
one at a time to decide which ones you want to keep.
Edit all the selected markdown files (with the .md extension) located in the content/home/ directory.
In addition to the about widget, I only retained the post, people and contact widgets.
You can order the appearance of each section by changing the variable weight of the widgets.
At any time, you can re-activate new widgets.
- The last step is to control the appearance of the menus at the top of your homepage.
You would need to edit the file
config/_default/menus.toml. Click on this file. The content is self-explanatory. You can remove or create menus. For instance, if you wish to create theProgramsmenu you would insert the following:
[[main]]
  name = "Programs"
  url = "programs/"
  weight = 10
You would then have a create a directory content/programs by selecting “New Folder” within the content directory in RStudio. The variable weight specifies the order of appearance of your menus.
If you specify a menu such as
[[main]]
  name = "Posts"
  url = "#posts"
  weight = 20
clicking on the “Posts” menu will lead you to the “Recent Posts” section within your homepage (if you did not deactivate the widget). If you change it to
[[main]]
  name = "Posts"
  url = "/post"
  weight = 20
clicking on the “Posts” menu will lead you to the “Posts” webpage which would list all your posts.
3. Create Content
Suppose you want to create a new post. First, you should look at the content of the content/post/ directory. This gives you idea on how to create content.
You will find a YAML file _index.md which you shoud not modify.
Use the “New Post” addin within Rstudio to create a new post or page, then edit the YAML metadata (the first lines between --- and ---), and
finally start writing the content. The title of your new post will appear in the homepage,
and you can click on the title to see the content. You can also click on the “post” menu to see a list of all your posts.
Markdown provides a simple formatting syntax for authoring HTML which is entirely made of punctuation characters. For more details on using R Markdown see http://rmarkdown.rstudio.com. You can also use HTML syntax if some markup is not covered by Markdown’s syntax. Here are the most basic syntax elements:
Headers: Place one or more hashtags at the start of a line to create a header or sub-header. For example, you can create a bold header with the syntax
### Section 1: Introduction. A single hashtag on a new line creates a header of the highest level.Italicized and bold text: Surround italicized text with asterisks,
*like this*to produce: like this. Surround bold text with two asterisks,**like this**to produce: like this.Lists: Group lines into bullet points that begin with asterisks. Leave a blank line before the first bullet, such as this
* Item 1

* Item 2

* Item 3- Hyperlinks: Surround links with brackets, and then provide the link target in parentheses, such as this
[Github](www.github.com).
Other content can be created in the content/ directory. For instance, create content in the content/project directory. This content must be accessible through the top menus of your website. There should already be a YAML file _index.md in this directory. Each of your projects can be created in separate markdown *md files in separate subdirectories.
Finally, you will find the static/ directory which stores static web files like pictures. If you store yhe image file static/python/pendulum.png, this picture can then be embedded in your post using the Markdown syntax . You can also use HTML code to do with more flexibility.
4. Technical Content
It is rather straightforward to include technical content in your webpage by using markdown files.
For instance, you can use special syntax to highlight code snippets. You can enable this feature by toggling the highlight option in your config/_default/params.toml file: set highlight = true. For instance, if you want to include python codes,
you would write
```python
import matplotlib.pyplot as plt
import numpy as np

x = np.arange(0.0, 4.0*np.pi, 0.1) # array of x values from 0 to 4*pi with increment of 0.1
y = 1 + np.sin(x)  # array of y values
plt.plot(x, y) # plot y vs x with continuous line (default)
```
which would render as
import matplotlib.pyplot as plt
import numpy as np

x = np.arange(0.0, 4.0*np.pi, 0.1) # array of x values from 0 to 4*pi with increment of 0.1
y = 1 + np.sin(x)  # array of y values
plt.plot(x, y) # plot y vs x with continuous line (default)
It is also possible to render Latex math expressions in your webpage.
You can enable this feature by toggling the math option in your config/_default/params.toml file.
To render inline or block math, wrap your LaTeX math with $...$ or $$...$$, respectively. For instance, this inline math expression
$J_n = \int_0^1 x(1-x)^n dx$ would render as \(J_n = \int_0^1 x(1-x)^n dx\).
This math block
$$
\newcommand{\bom}{\boldsymbol{\omega}}
\bom_{1/2}+ \bom_{2/3}+ \bom_{3/1} = {\bf 0}
$$
would be rendered successfully as \[ \newcommand{\bom}{\boldsymbol{\omega}} \bom_{1/2}+ \bom_{2/3}+ \bom_{3/1} = {\bf 0} \] I have had more problems rendering multiline equations such as this
$$
\newcommand{\bom}{\boldsymbol{\omega}} \newcommand{\bv}{\boldsymbol{v}}
\{ {\cal V}_{i/j} \} =
\begin{Bmatrix} \bom_{i/j} \\ \bv_{A\in i/j}
\end{Bmatrix}
$$
If you save your file with the extension .md, this will fail. However, if the file is saved with the extension .rmd, it renders successfully:
\[
\newcommand{\bom}{\boldsymbol{\omega}} \newcommand{\bv}{\boldsymbol{v}}
\{ {\cal V}_{i/j} \}
=
\begin{Bmatrix}
\bom_{i/j}
\\
\bv_{A\in i/j}
\end{Bmatrix}
\]
5. Deploy your Website
There are many ways to deploy (i.e. publish) your website.
Most articles recommend deploying in Netlify through GitHub, and the process
appears to be smooth.
In principle, all you need to do to deploy your site is to copy the public/ directory (by SFTP, WebDAV, Rsync, git push, …) to your web server.
I have adopted the process described here.
Since I have access to my department web host via SSH, the use of a simple rsync command
makes the incremental deployment of my Hugo website a very simple matter.
I highly recommend this method.
Note that if your previous generations are not removed by hugo.
It is often a good thing to delete your previous public/ directory
prior to running hugo. This will ensure that old deleted pages are no longer visible from your website.