This work session illustrates how to use ANSYS to analyze three-dimensional solid deformation.
The Connecting Lug
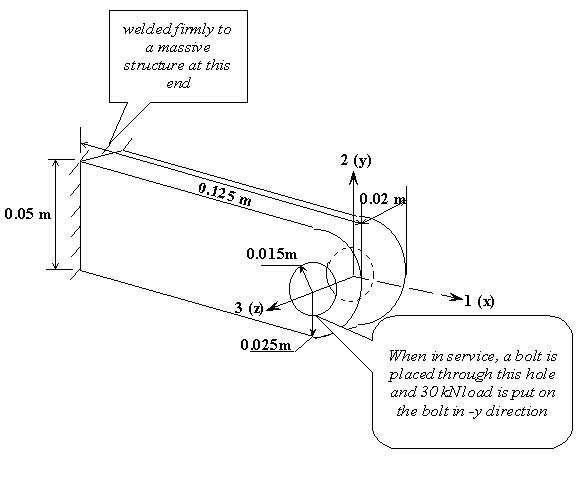
(Note: 30 kN vertical load is replaced by a pressure distribution of 50 MPa over the bottom half of the hole.)
Find: the deflection and stress distribution in the lug .
Element configuration on x-y plane
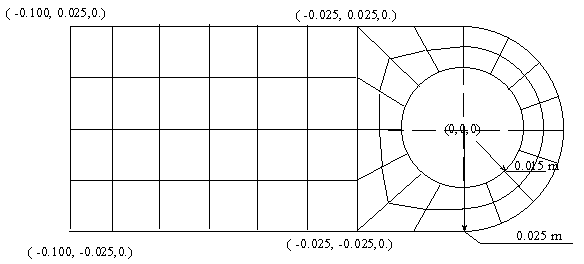
Plus two uniform intervals in the z direction.
The linear elastic model:
Steel as material: Young's Modulus E=200 GPa and Poisson
Ratio u = 0.3
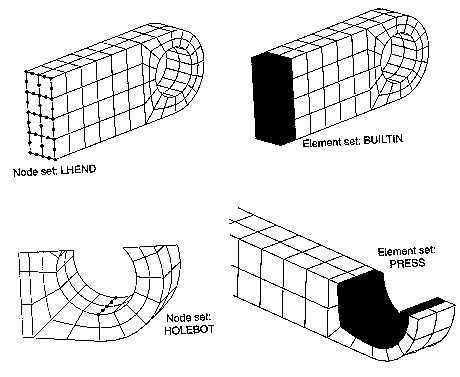
Notes: (1) LHEND is defined by attaching nodes to areas on
the left end; (2) BUILTIN is defined by attaching elements to
LHEND nodes; (3) HOLEBOT is defined by attaching nodes to
the line at the lowest point of the hole; (4) PRESS
is defined by first grouping all nodes attached to the three areas
where pressure is applied, then attaching elements to these nodes.
The procedure for building the model
The procedure for building the model for the connecting lug:

NOTE: We will use cm-g-s unit system in what follows.

STEP 1: Preferences - Check Structural - OK

STEP 2: Set element type.
Preprocessor - Element Type - Add/Edit/Delete - Add -
Structural Solid / Brick 20node 95 - OK

STEP 3: Material Properties.
Preprocessor - Material Props - Material Model -
Structural - Linear - Elastic - Isotropic - Enter
EX = 200E+10, and PREX = 0.30

Material Models - Exit

STEP 4: GEOMETRY SET-UP
STEP 4a:
========
Create -  Volume -  Block -  By dimension -
X1,X2 = -10. -2.5
Y1,Y2 = 0.  2.5
Z1,Z3 = 0.  2.0

STEP 4b:
========
Create - Volume - Cylinder - Partial Cylinder
Rad-1 = 1.5, Theta-1 = 0., Rad-2=2.5, Theta-2 = 90, Depth=2
OK

STEP 4c: ADJUST THE VIEW ANGLE
PlotCtrls - Pan,Zoom,Rorate - Iso

STEP 4d: Create an arc containing two lines  By Center & Radius:
  -- Create - Lines - Arcs - By Center & Radius
  -- In the input window, first type the location of the center: 0.,0.,0. and hit return
  -- then input the second point 0.,1.5,0. and hit return
  -- A window will pop up to allow you to input angle (90) and number of lines (2)
 (The above will draw two 45-degree arc lines extending from north to west.)

STEP 4e: GLUE LINES
Preprocessor - Operate - Glue - Lines - Pick All

STEP 4f: Add three new lines.
Create - Lines - Straight lines

STEP 4g: Create two new areas by lines
Create - areas - Arbitrary - By lines

STEP 4f: Create two new volumes
Operate -  Extrude - Areas/Along lines

STEP 4g: This step is needed to eliminate the redundant key points etc.
Operate - Glue - Volumes - Pick ALL

STEP 4h: SYMMETRY Refelection
Modeling - reflect - Volumes - Pick All - wrt xz plane - OK

STEP 4i:  Operate - Glue - volume - Pick ALL

STEP 4j: Seed meshes along edge lines
6 intervals on long lines, 4 on long arcs, 2 on others

Mesh Tool - Line Set

Mesh Tool - Mesh, Volume, Hex, Map - Pick ALL

STEP 5 : Boundary conditions
=========
Solution>loads/Apply>Displacements>Area

STEP 5a: zero displacement
 CONSTRAINT AT ALL PICKED AREAS
      LOAD LABELS = UX    UY    UZ
      VALUES =          0.             0.

STEP 5b: Pressure load
======================
Apply>Pressure>On Areas
 SURFACE LOAD ON ALL PICKED AREAS
     LOAD KEY =1         LOAD LABEL = PRES
     VALUES =          0.50000E+09              0.

STEP 6: Define Selected ENTITIES:

a) LHEND:
Select>Entities>Areas (Pick the two areas on the end)
Select>Entities>Nodes, Attached to Area, Area All
 (37 nodes selected)
Select>Comp/Assembly>Create Component, LHEND

b) BUILTIN:  Elements attached to the node set  LHEND
c) Node Set HOLEBOT: Element attached to the line
d) Element set PRESS: First select nodes attached to the three areas on the bottom; then
the elements attached to nodes.

STEP 7: SOLVE
===============
Deformation at the bottom of the hole:
UX = -0.04171 mm
UY = -0.3123 mm

Maximum Von Mises Stress at the attachment (node value) is about 360 MPa.
Maximum Von Mises Stress at the hole (node value) is about 300 MPa.
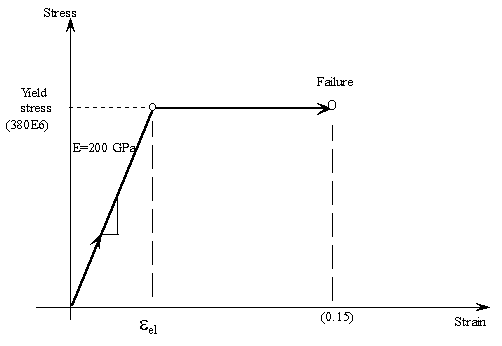
Nonlinear Plastic Model: An accident load of 60 kN
A simplified model (perfectly plastic):
-- yield stress = 380 MPa, no hardening, strain at failure = 0.15
 Modifications to the previous ANSYS model:
(1) Define and fill Bilinear Kinematic Hardening table (BKIN)
    Preprocessor - Material Props - Material Models - Structural
                 - Nonlinear - Inelastic - Kinematic Hardening - Bilinear
    Yld stress = 380E7 (in cm-g-s units)
    Tang Mod = 0.

    Material - Exit

(2) Change the magnitude of the pressure load:
    Solution - Loads/Delete - Pressure - On areas
    Pick the three areas at the bottom of hole - OK - OK

    Solution - Loads/Apply - Pressure - On areas
    Pick the three areas at the bottom of hole - Ok
    Value = 1.0e9
    OK

(3) Solution options:
    Solution - Analysis type/New analysis = Static - OK
    Solution - Sol'n Control
    Basic:  Analysis option = Large Displacement Static
            Time at end of load step = 1.0
            Automatic time stepping = on
            Number of Substeps = 10
            Maximum no of substeps = 10
            Frequency: Write every substep
    OK

(4) Solve / Current LS


(5) Take a look at the file called Lug.mntr

 SOLUTION HISTORY INFORMATION FOR JOB: Lug.mntr

 ANSYS RELEASE  5.7             .1      09:13:13    03/18/2002

 LOAD SUB-  NO.   NO.  TOTL   INCREMENT    TOTAL       VARIAB 1    VARIAB 2    VARIAB 3
 STEP STEP  ATTMP ITER ITER   TIME/LFACT   TIME/LFACT  MONITOR     MONITOR     MONITOR
                                                       CPU         MxDs        MxPl

   1     1    1     2     2   0.10000     0.10000      7.7900     -.83903E-02 0.78886E-30
   1     2    1     1     3   0.10000     0.20000      12.730     -.16780E-01 0.78886E-30
   1     3    1     1     4   0.15000     0.35000      17.410     -.29365E-01 0.78886E-30
   1     4    1     1     5   0.22500     0.57500      22.010     -.48241E-01 0.78886E-30
   1     5    1     4     9   0.21250     0.78750      33.880     -.71821E-01 0.18432E-02
   1     6    2     3    18   0.10000     0.88750      59.750     -.97588E-01 0.27577E-02
   1     7    1     4    22   0.56250E-01 0.94375      71.670     -.15595     0.66519E-02

You can also check List / Results / Load Step Summary.

This indicates that 7 load substeps are performed, CPU time for each that took for the solution
of  each substep, and the percentage of load that is applied (Total Time). Note that the
lug collapses after 94% of load is applied.

(6) You can look at results for each substep by
    General Postproc -
    By Load Step - Set LSTEP=1, SBSTEP = 1 to 7 to LAST.